In the Studio
with Handcolorist Ginger Pozzini
Ginger’s handcolor specialty is primarily in landscape and still life. Ginger has been an avid photographer all of her life and has especially enjoyed photographing the Italy that she loves. In 1998, Ginger took a "Handcoloring black & white photos" class at the University of Minnesota. The class opened a whole new world for Ginger allowing her to combine her love of photography with a hands-on creative process of interpreting a black & white image through the use of colors.
Ginger shares her passion & technique of handcoloring black & white photos…
"When I handcolor a picture of Italy, it gives me a more intimate feeling of the place and people of Italy. I endeavor to capture the essence of Itlay by studying buildings and walls and see years of loving care and preservation as they have been patched and repaired over generations. I see people’s expression of space with ancient doorways and flowerpots surrounding an entry or window. This is what I so love about Italy"
 About technique:
"I handcolor black and white photos developed on a high grade of fiber-based paper. I first mount the black & white photo using drafting tape on an art board to create a flat smooth working surface. Most of my prints are 8 X 10 although I have done prints as large as 16 X 20 and as small as 4 X 6. Once mounted, I use solutions called Marshall’s PMS solution or mineral oil to clean & prepare the print for taking color."
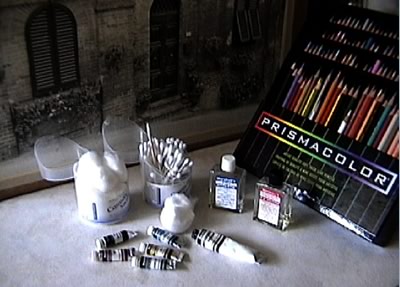
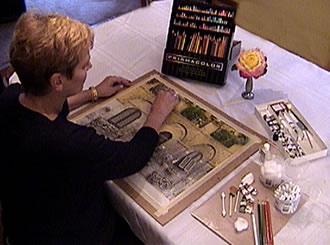
"My workshop is generally my dining room table with a good light over my left shoulder. For applying colors, I use primarily Marshall’s brand of photo oils and colored pencils. My tools are cotton balls, various shapes & sizes of Q-tips, bamboo skewers, toothpicks, fine paintbrushes and paper towels & a small artist palette for mixing colors."
 "When starting the print I generally work from top to bottom & background to foreground. Colors are applied with both photo oils and pencils and then rubbed down and smoothed gently using cotton balls, various shapes of q-tips and cotton wrapped skewers. For more intense colors such as vibrant floral colors, I apply "extra strong oils", which are more opaque using a fine brush while viewing through a magnifying glass. To keep the color intensity, I do not smooth these areas. This can lengthen the drying time by up to 2 weeks."
The final step is detailing & highlighting, which makes the print come to life. I like to add yellow highlights to green leaves or grass to give it dimension or silver to pull out detail. Another trick is to use indigo blue in shaded areas for depth. This is truly the creative aspect of giving the print a more dimensional feeling. The print is now ready to dry for 48 hours or more. Once the print is dry it is ready to mat and frame.
Ginger Pozzini
Phone: 651-768-0542
Email: ginger@italiantravelcoach.com
Website: www.italiantravelcoach.com
 About technique:
"I handcolor black and white photos developed on a high grade of fiber-based paper. I first mount the black & white photo using drafting tape on an art board to create a flat smooth working surface. Most of my prints are 8 X 10 although I have done prints as large as 16 X 20 and as small as 4 X 6. Once mounted, I use solutions called Marshall’s PMS solution or mineral oil to clean & prepare the print for taking color."
"My workshop is generally my dining room table with a good light over my left shoulder. For applying colors, I use primarily Marshall’s brand of photo oils and colored pencils. My tools are cotton balls, various shapes & sizes of Q-tips, bamboo skewers, toothpicks, fine paintbrushes and paper towels & a small artist palette for mixing colors."
 "When starting the print I generally work from top to bottom & background to foreground. Colors are applied with both photo oils and pencils and then rubbed down and smoothed gently using cotton balls, various shapes of q-tips and cotton wrapped skewers. For more intense colors such as vibrant floral colors, I apply "extra strong oils", which are more opaque using a fine brush while viewing through a magnifying glass. To keep the color intensity, I do not smooth these areas. This can lengthen the drying time by up to 2 weeks."
The final step is detailing & highlighting, which makes the print come to life. I like to add yellow highlights to green leaves or grass to give it dimension or silver to pull out detail. Another trick is to use indigo blue in shaded areas for depth. This is truly the creative aspect of giving the print a more dimensional feeling. The print is now ready to dry for 48 hours or more. Once the print is dry it is ready to mat and frame.
Ginger Pozzini
"When starting the print I generally work from top to bottom & background to foreground. Colors are applied with both photo oils and pencils and then rubbed down and smoothed gently using cotton balls, various shapes of q-tips and cotton wrapped skewers. For more intense colors such as vibrant floral colors, I apply "extra strong oils", which are more opaque using a fine brush while viewing through a magnifying glass. To keep the color intensity, I do not smooth these areas. This can lengthen the drying time by up to 2 weeks."
The final step is detailing & highlighting, which makes the print come to life. I like to add yellow highlights to green leaves or grass to give it dimension or silver to pull out detail. Another trick is to use indigo blue in shaded areas for depth. This is truly the creative aspect of giving the print a more dimensional feeling. The print is now ready to dry for 48 hours or more. Once the print is dry it is ready to mat and frame.
Ginger PozziniPhone: 651-768-0542
Email: ginger@italiantravelcoach.com
Website: www.italiantravelcoach.com

